Sales Order Demo
Overview
This demo demonstrates the process of sales order and its basic operations in supOS platform.
info
Data used in the demo is for reference only.
Operation Process
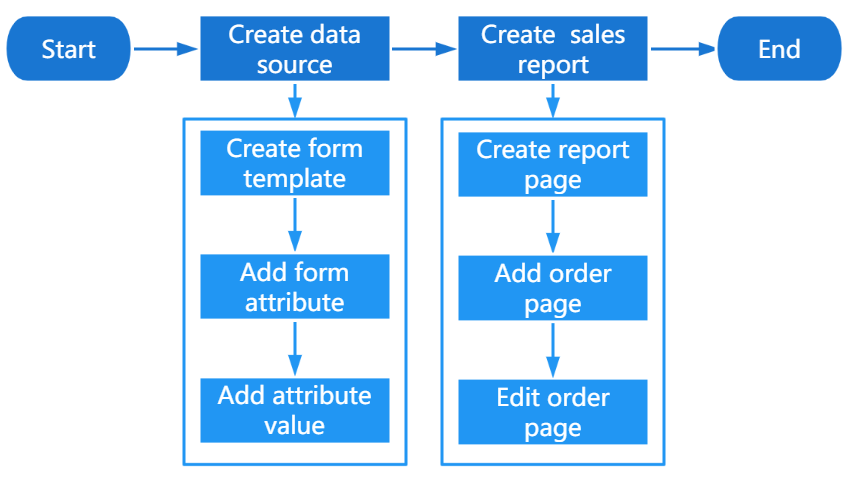
Creating Data Source
Manually add data in form template for subsequent data display on sales order report table.
tip
You can also get data from third-party databases by form service. For details, see Third-party Database Connection.
- Log in to supOS platform, and then click
 to go to the design center.
 - Select Object Model Management > Object Template > Form Template, and then click
 to add a sales order template.
Each form template can be seen as an empty table, and each attribute in the template is a column of the table.
- Enter the basic information of the form template.
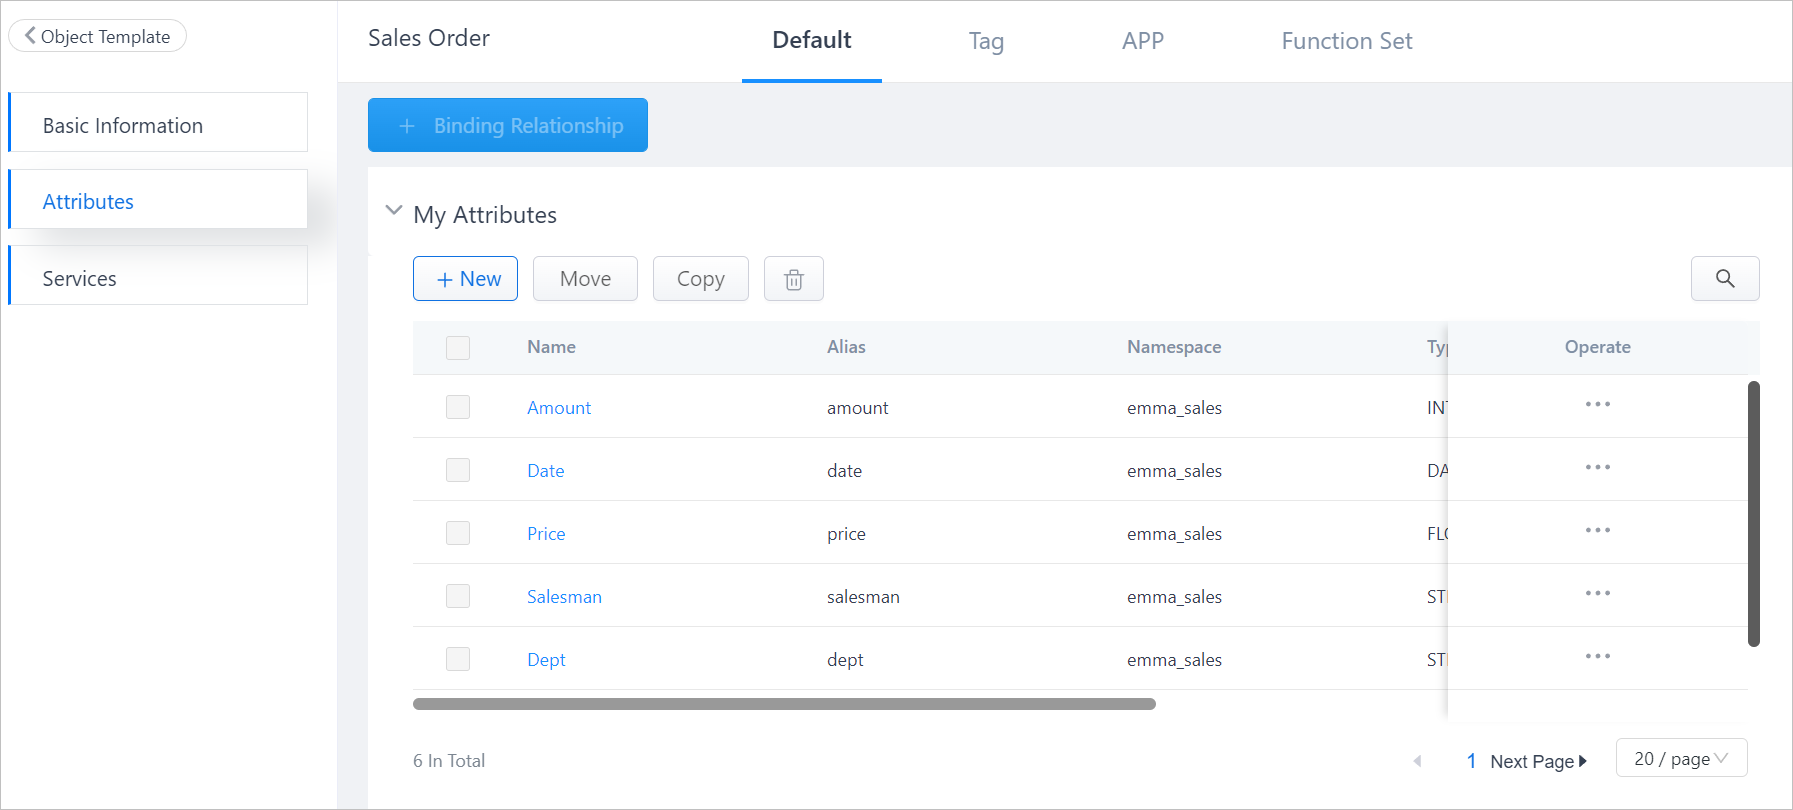
- Add attributes in Attributes tab that are necessary in sales order report.
- Go back to Object Model Management page, click Object Instance tab, and then under Form Template, find the template you added and create new instances.
In the Attributes tab, click corresponding to each attribute to add a value.info
Each instance attribute is a row of data on the form template table.
Creating Sales Order Application
On Business Designer, create a sales order table and related adding and editing page. With the template data, you can view, add and edit sales order information.
- On supOS platform, under Business Designer, add a new application.
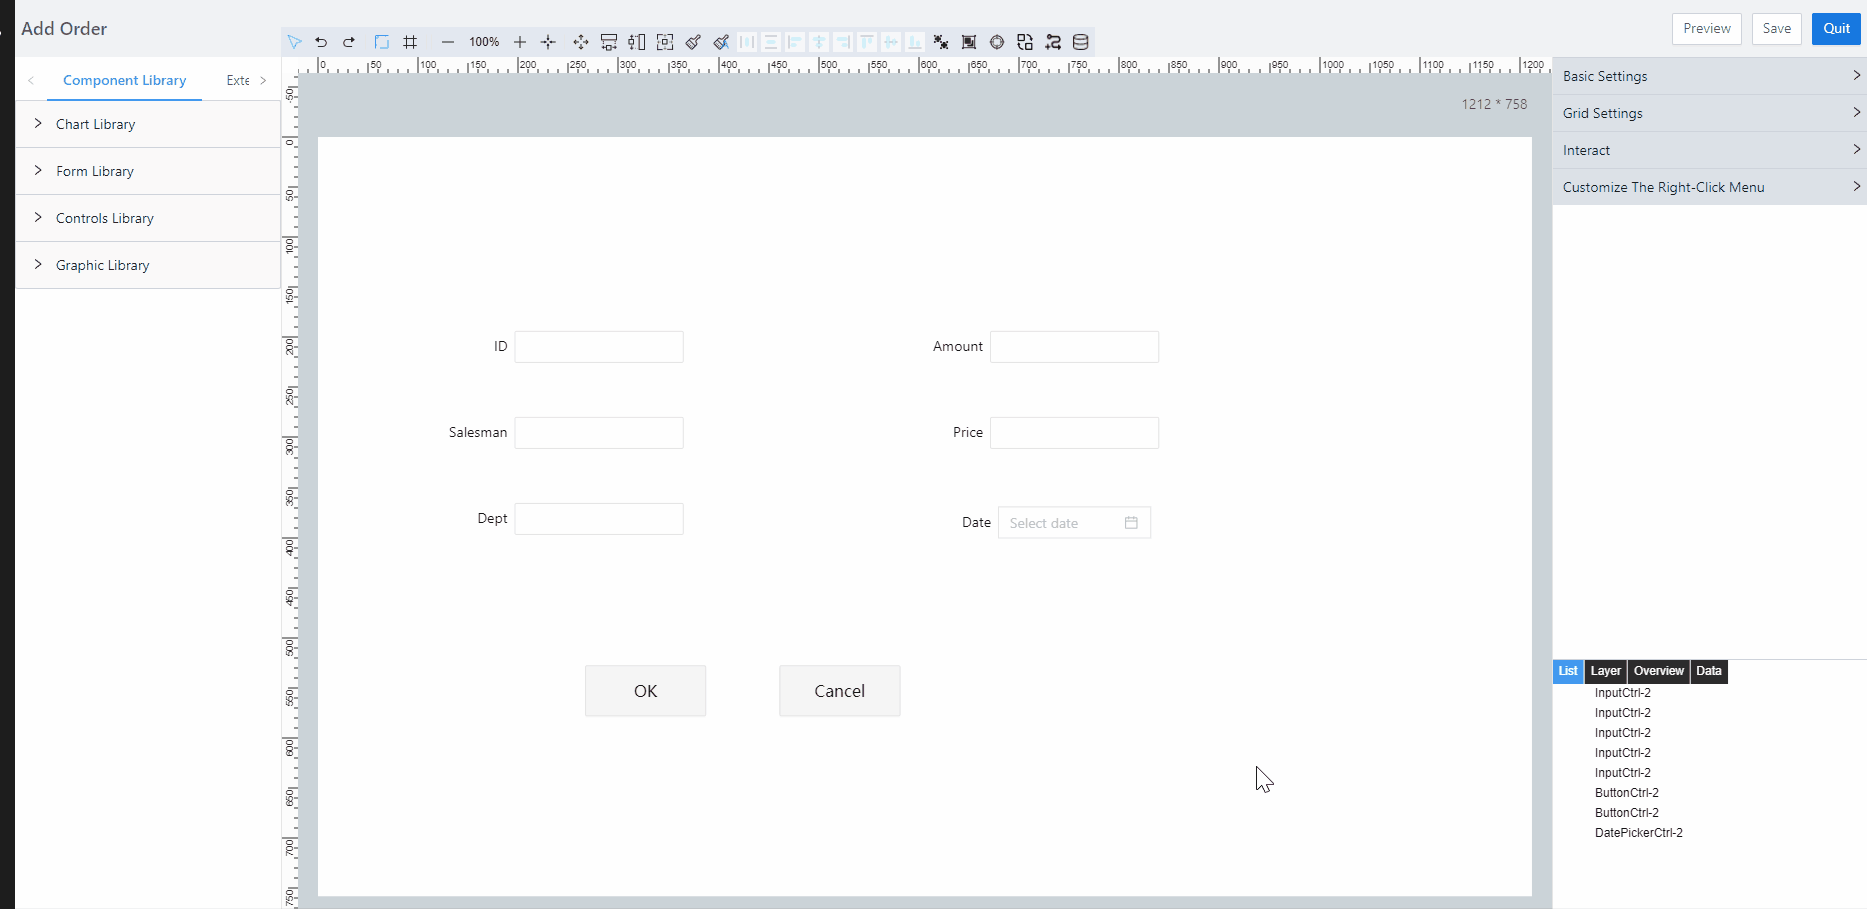
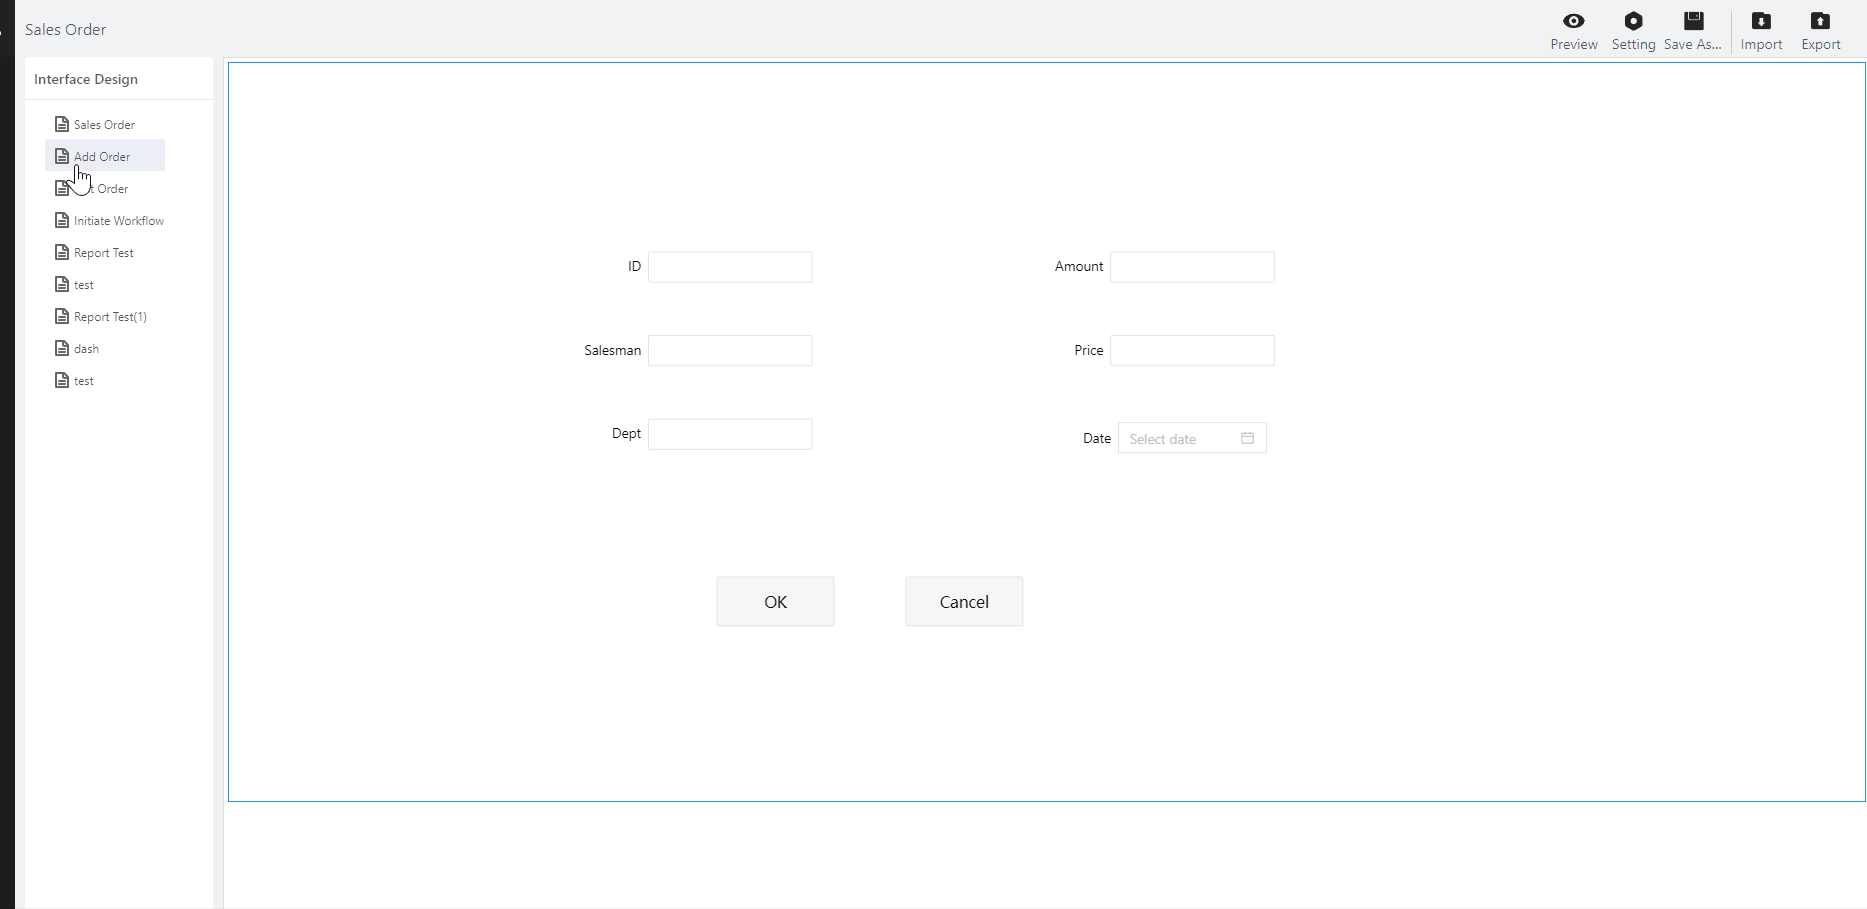
- Click Edit Page to enter the application, and then add an Add Order page which contains all attributes in sales order template.
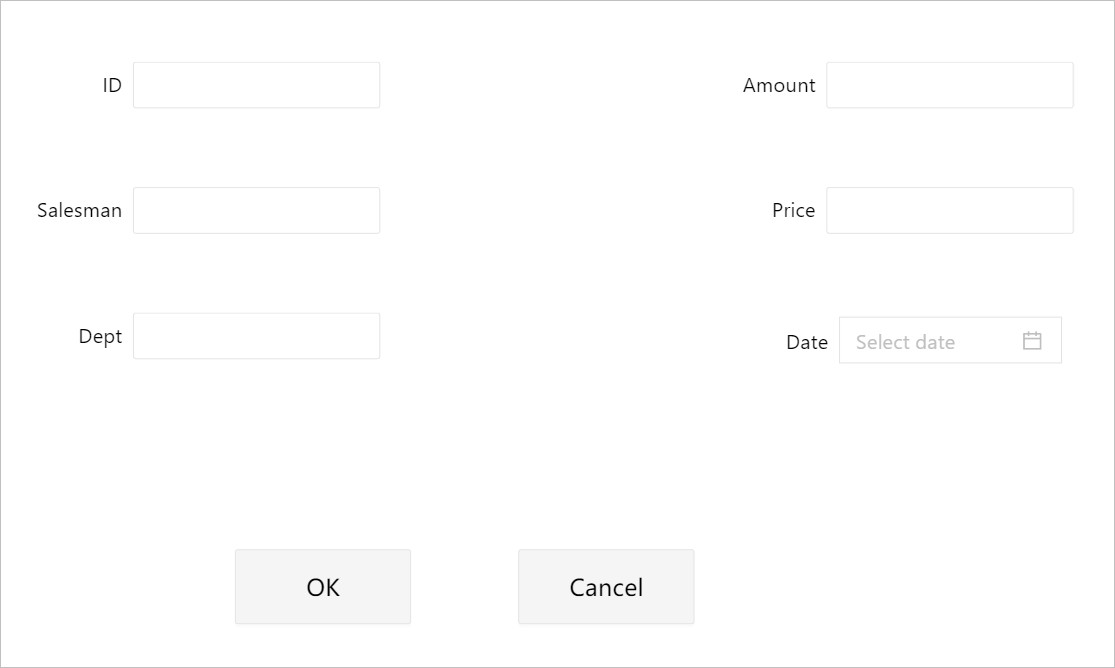
- Add a click event to OK button and write its script.
var formEntity = scriptUtil.getFormData(['id','amount','salesman','dept','price','date']); //get data from the page by component ID
scriptUtil.addDataTable( //add the entered data to the form template
  {
    dataSource: 'emma_sales.sales_order', //form template namespace.form template alias
    properties: formEntity, //must be array
    version: 'V2',
  },
  function (res) {
   scriptUtil.showMessage('Successfully Saved!', 'success')
   window.parent.scriptUtil.getRegisterReactDom('htDiv-l78qpdgd0-79').reloadTableData(); //add data to the sales order table on another page for display
   setTimeout(function(){
       window.parent.scriptUtil.closeModal();
   },500)

  }
);
- Add a click event to Cancel button and write its script.
window.parent.scriptUtil.closeModal();
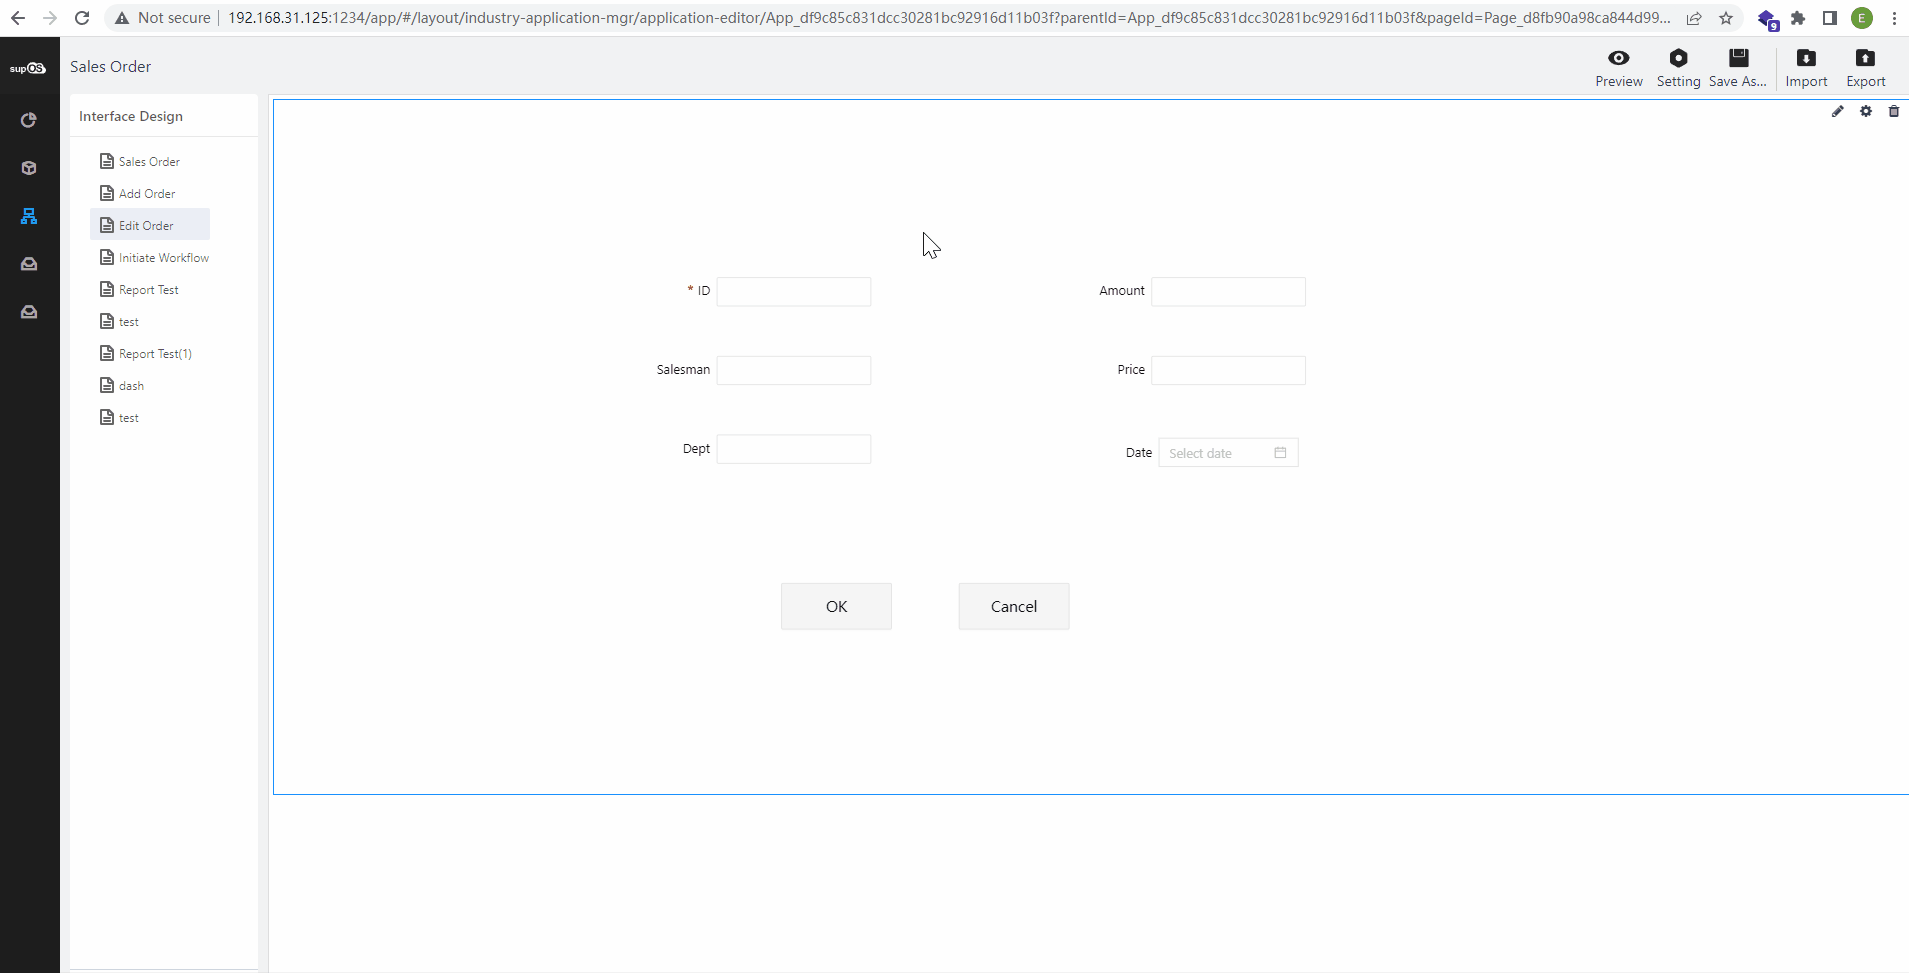
- Copy the Add Order page and rename it to Edit Order.
- Change the click event script of the OK button.
var formEntity = scriptUtil.getFormData(['emma_sales.id','emma_sales.amount','emma_sales.salesman','emma_sales.dept','emma_sales.price','emma_sales.date']); //get data from the page by component ID
scriptUtil.updateDataTable( //update data entered on the page to the form template by matching template attribute alias with component id
  {
    dataSource:'emma_sales.sales_order',
    properties: {
        'id':formEntity['emma_sales.id'],
        'amount':formEntity['emma_sales.amount'],
        'salesman':formEntity['emma_sales.salesman'],
        'dept':formEntity['emma_sales.dept'],
        'price':formEntity['emma_sales.price'],
        'date':formEntity['emma_sales.date'],
    }, // must be array
    keys:{
        'id':formEntity['emma_sales.id'] //primary key which is used to be the matching standard
    },
    version: 'V2',
  },
  function (res) {
   scriptUtil.showMessage('Successfully Changed!', 'success')
   window.parent.scriptUtil.getRegisterReactDom('htDiv-l78qpdgd0-79').reloadTableData(); //update the table on <strong>Sales Order</strong> page for display
   setTimeout(function(){
       window.parent.scriptUtil.closeModal();
   },500)

  }
);
- Add a Content Loading event to the page and write its script.
var res = window.parent.localStorage.getItem("rowData"); //get the row of data when clicking corresponding <strong>Edit</strong> button from local storage
if(res){ //replace the data and save it to local storage
    var entity = JSON.parse(res);
    scriptUtil.setFormData(entity);
}
- Leave the Cancel button event the same.
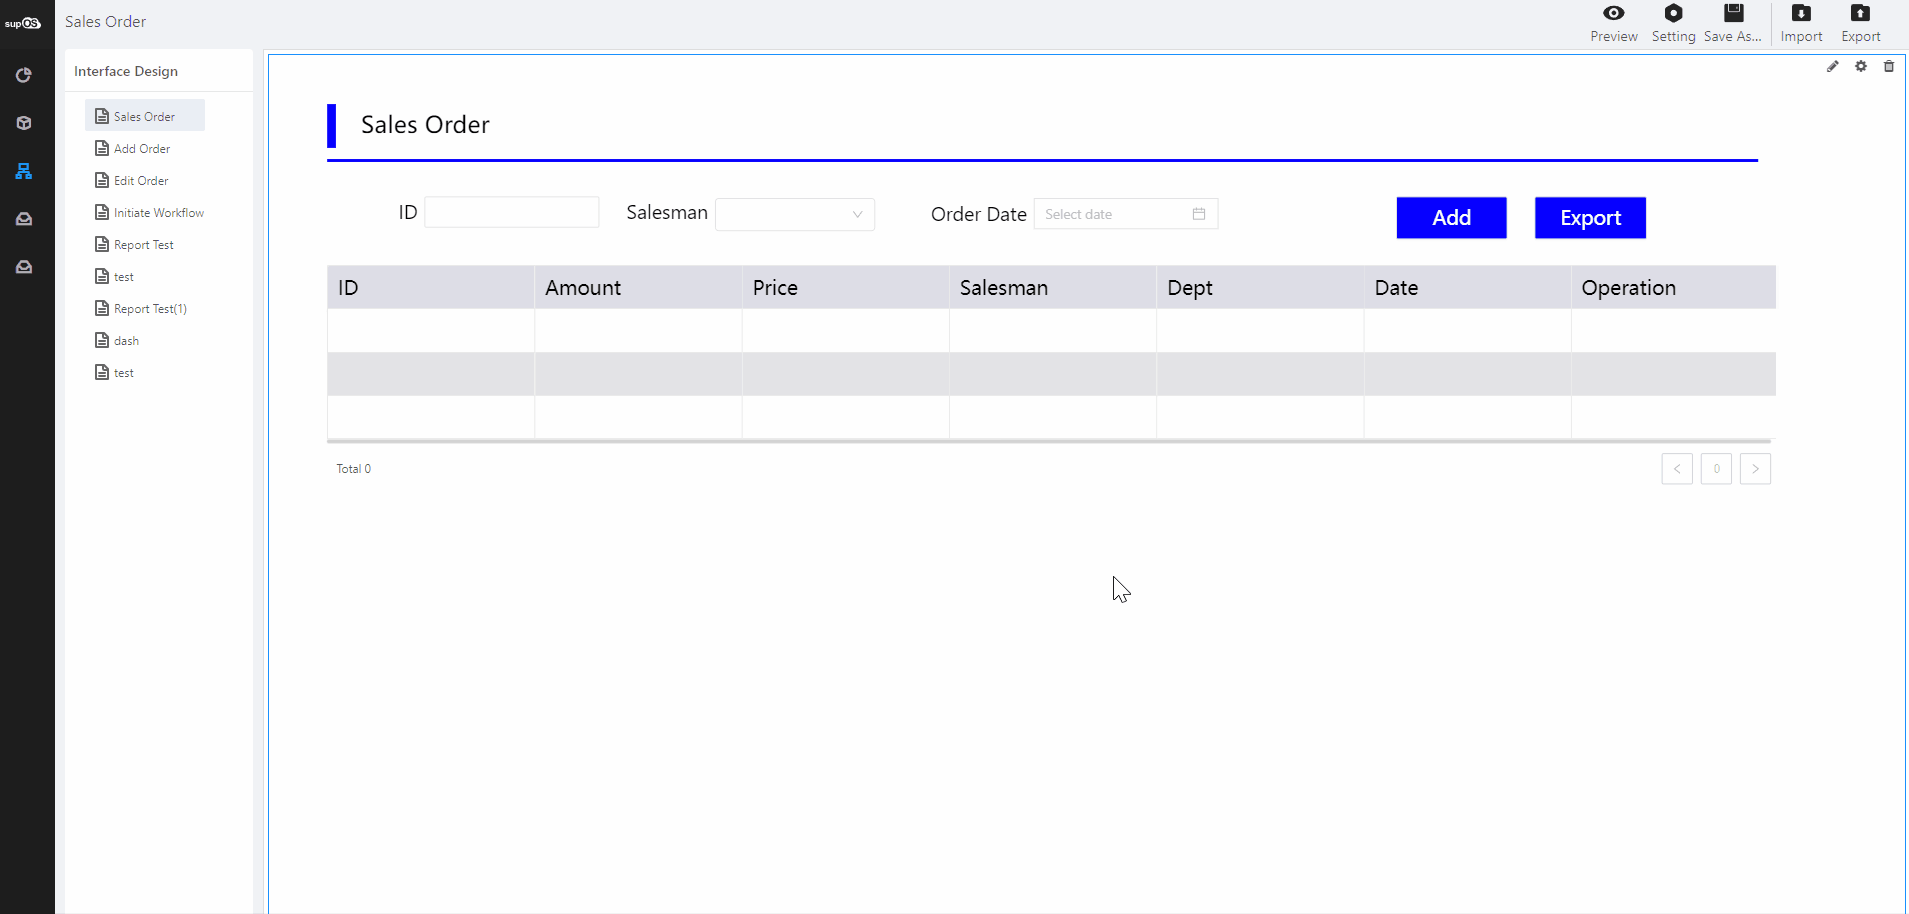
- Add a sales order page.
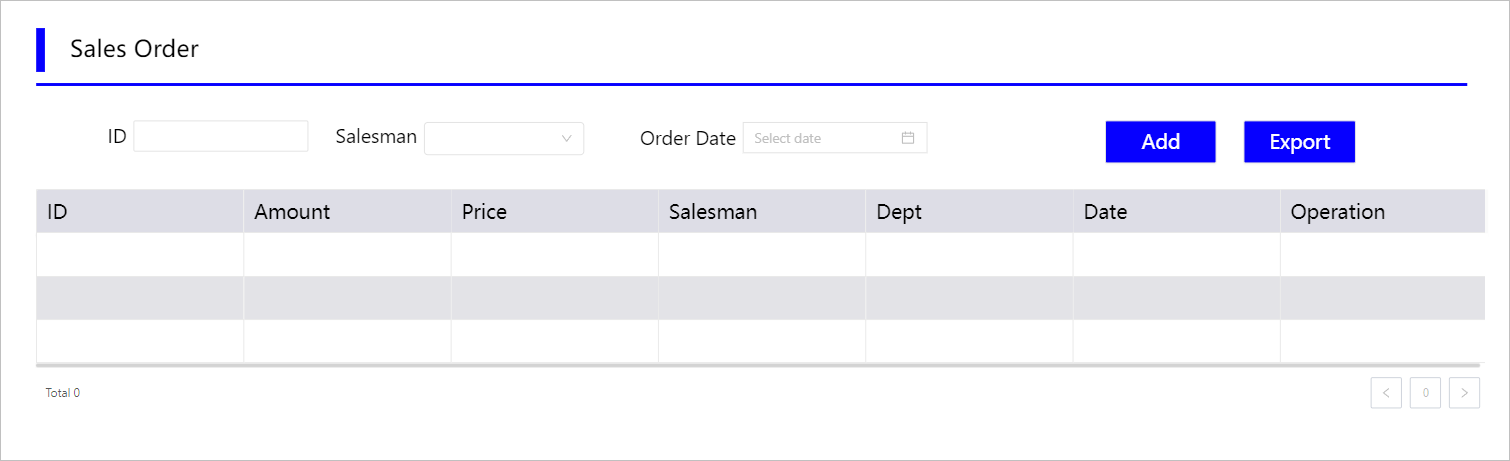
- Add the form template to be the table data source and set corresponding headers with attributes.
- Add corresponding attribute as the data source of the Salesman drop-down list under list Property > Dynamic Data.
- Link all three search conditions, including ID, salesman and order date to corresponding data columns of the table under table Property > Linkage Object
- Add a Click event to the Add button and link it to Add Order page.

- Add Content Loading event to the page.
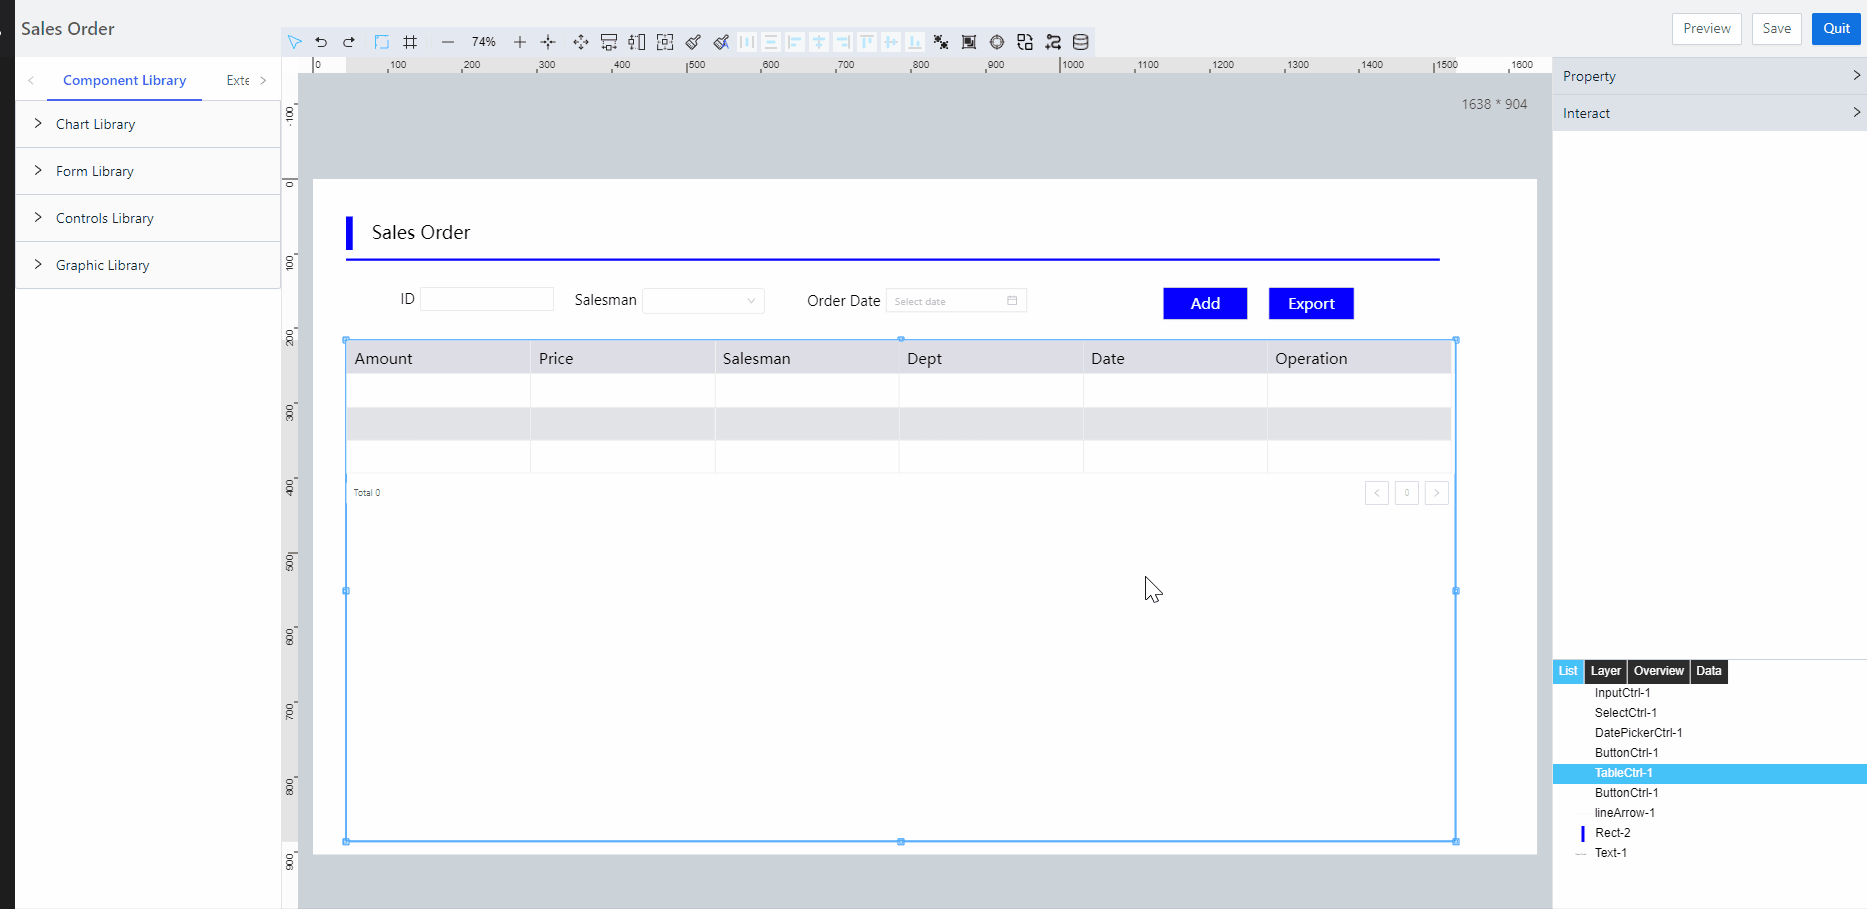

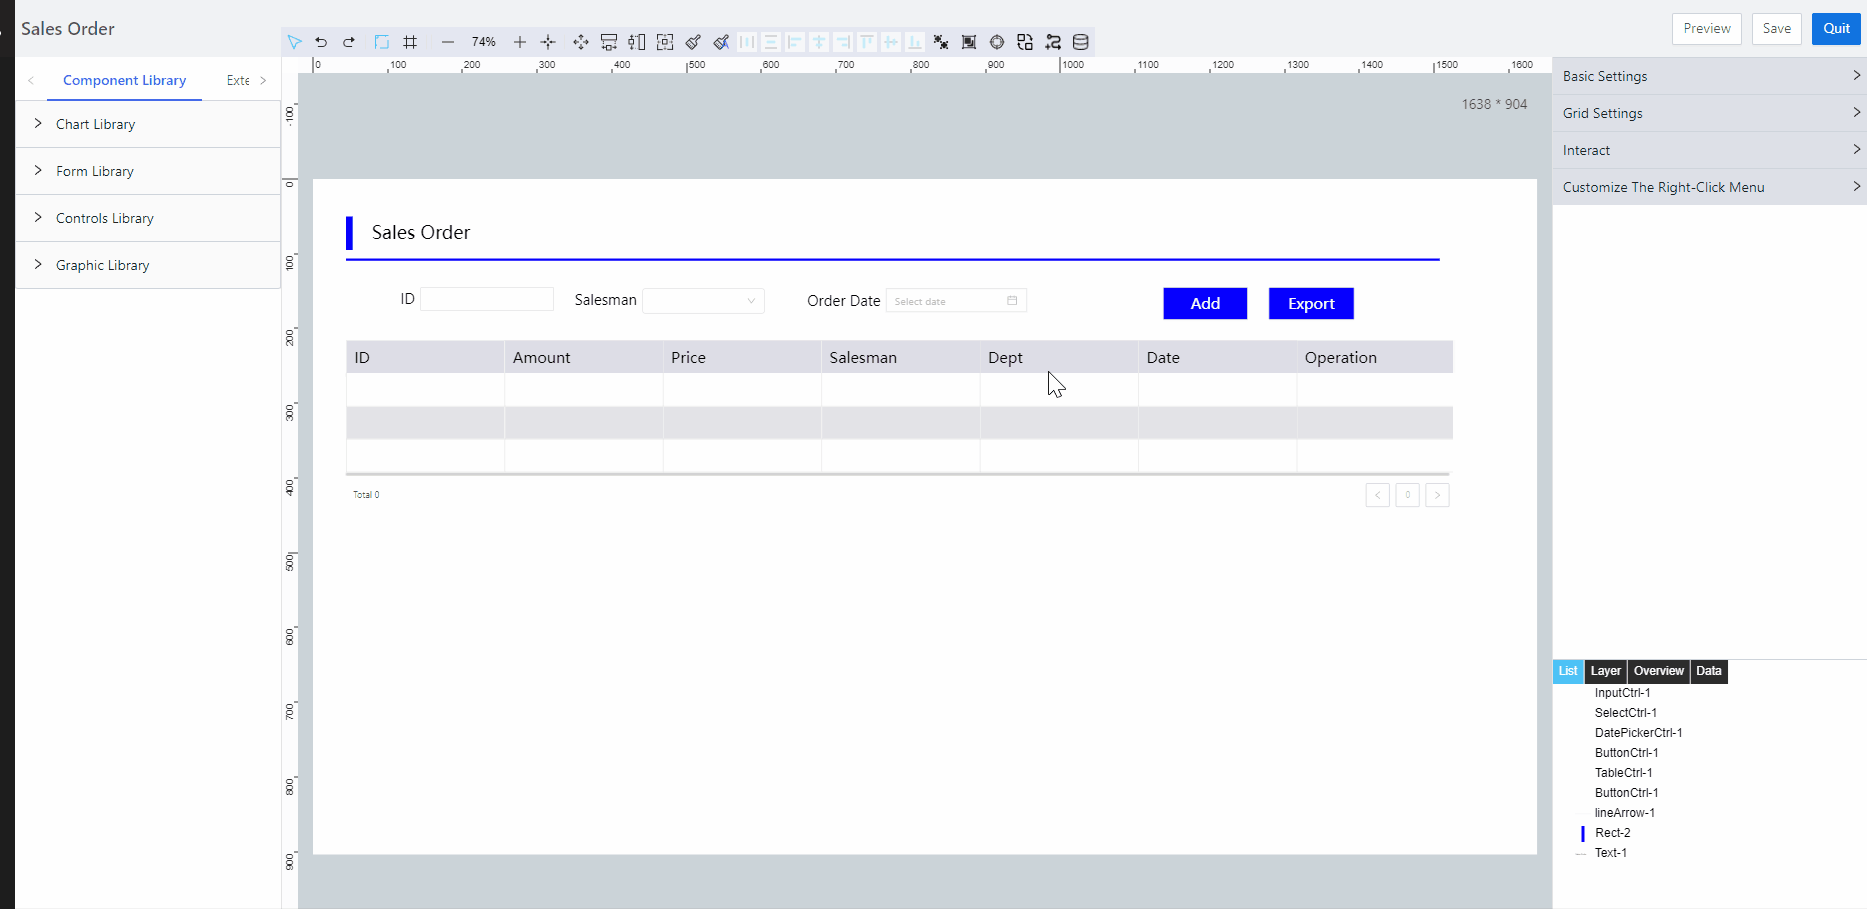
var table = scriptUtil.getRegisterReactDom('htDiv-l78qpdgd0-79'); //get the sales order table
    var columnOperation = [ //add an edit button to the table and configure its style
        {
            name: 'Edit',
            style: {
                width: '48px',
                height: '34px',
                backgroundColor: '#3377FF',
                borderRadius: '5px',
                color: '#fff',
                padding: '0px 0px',
                border: '0px',
            },
            click: function (row){ //update the entered data to the table upon clicking the button
                if(row){
                    localStorage.setItem("rowData",JSON.stringify(row)) //get the current row data
                    scriptUtil.showModal('{"width":800,"height":624,"needTitle":false,"margin":0,"isCenter":true,"url":"/#/runtime-fullscreen/runtime-fullscreen/Page_d8fb90a98ca844d997de02d661d7485c"}')
                    //set the style and path of the pop-up page (edit order page) after clicking the edit button
                }
            }
        },
        { //add a delete button
             name: 'Delete',
            style: {
                width: '48px',
                height: '34px',
                backgroundColor: '#FF7875',
                borderRadius: '5px',
                color: '#fff',
                padding: '0px 0px',
                border: '0px',
            },
            click: function (row){
                scriptUtil.delDataTable( //match the data with form template by id and delete row data upon clicking the button
                    {
                        dataSource: 'emma_sales.sales_order',
                        properties: [{'id':row['emma_sales.id']}],
                        version: 'V2'
                    },
                    function(res){
                        scriptUtil.showMessage('Successfully Deleted!', 'success')
                        window.parent.scriptUtil.GetRegisterReactDom('htDiv-l78qpdgd0-79').reloadTableData();
                    }
                    );
                    }
        },
];
        table.setColumnOperation(columnOperation);
info
Preview the edit order page and then on the address bar, you can see its page ID after pageId.
- Save the pages and go back to the Business Designer page, and then publish the application of sales order.
Demo Effect